Sequences: automatic enrollment using Automations
You can now automatically enroll deals and leads into a sequence using the Automations feature. This helps you save time and standardize follow-up actions by triggering enrollment based on record creation, updates or dates without any manual input.
Note: The Automation feature is only available on the Growth plan and higher.
How automatic enrollment works
In Automations, you can now configure Sequences as an action step. This means that when a deal or lead is created, updated or reaches a specific date, you can automatically trigger its enrollment into a specific sequence.
Setting up automatic enrollment in Automations
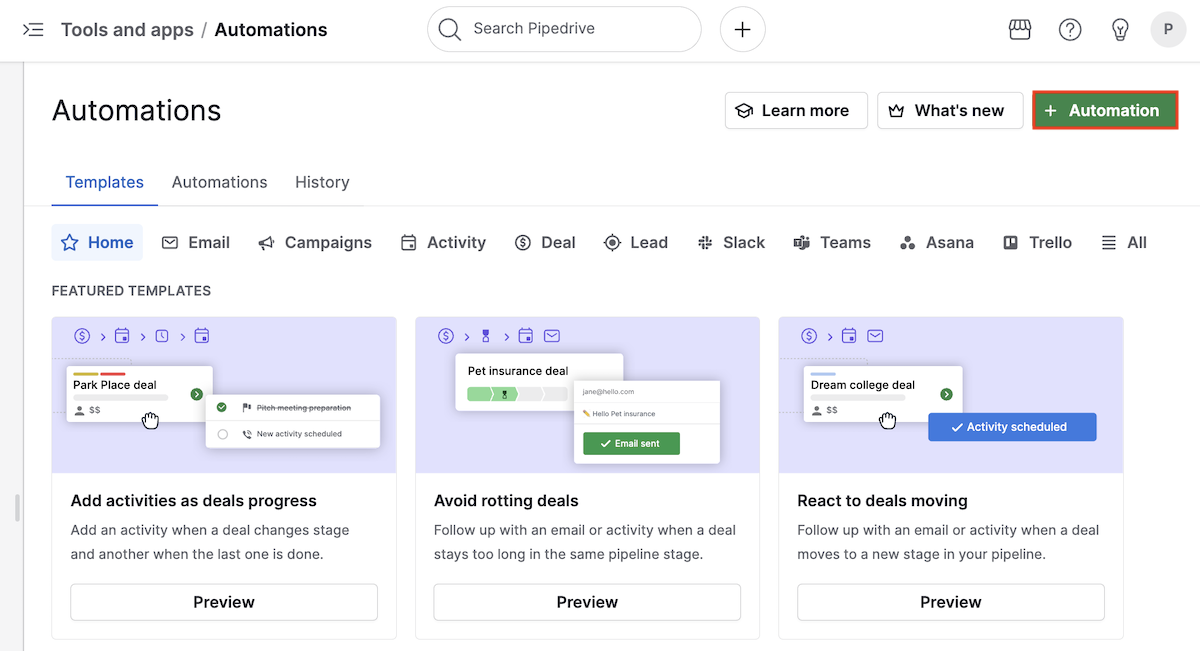
To automatically enroll deals or leads into a sequence, go to Tools and apps > Automations.
You can select an existing template for sequences in either the deal or the lead tabs, create a new automation or edit an existing one.
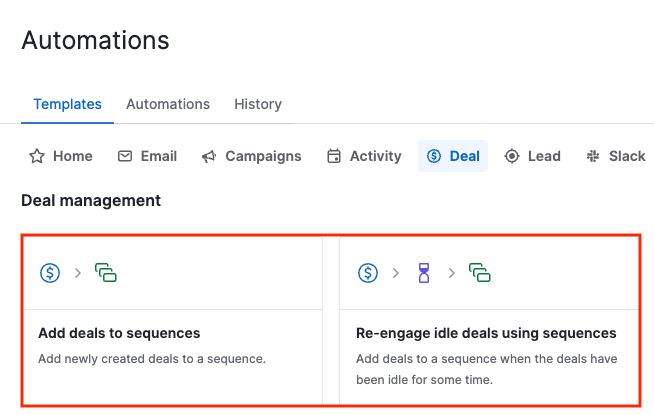
Using a deal template
Click the Template tab > Deal, choose either the “Add deals to sequences” or the “Re-engage idle deals using sequences” template, then click “Use template” in the Template preview screen.
In this example, we‘ll set up an automation to add deals to a sequence.
You‘ll be prompted to select the pipeline and the sequence to which the deal will be added.
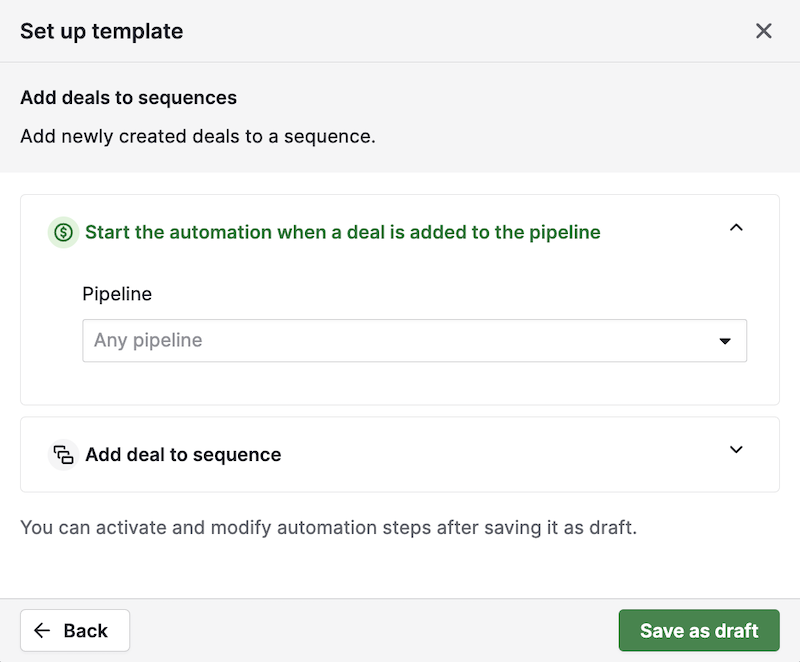
This step requires you to select the sequence to which you‘ll send your deals. Once you’ve done so, click “Save as draft,” and you‘ll be taken to the automation flow, where you can edit it before activation.

Remember that it will only start working after you toggle the “Active” switch on top.
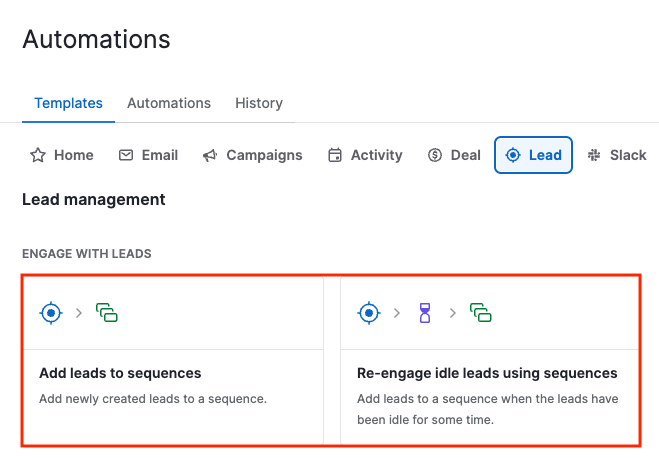
Using a lead template
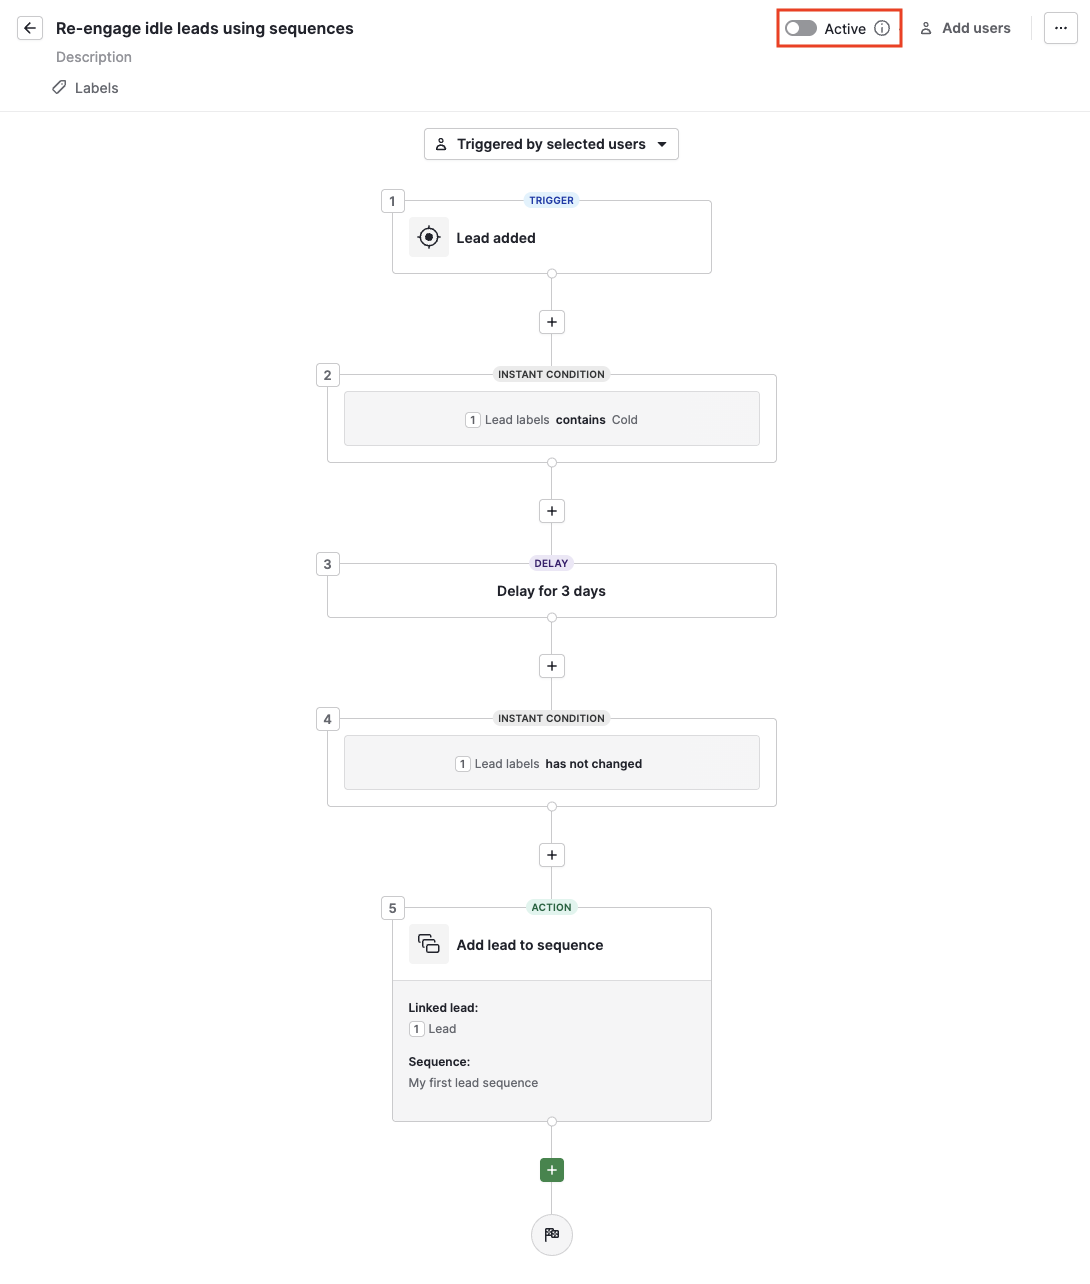
Click the Template tab > Lead, choose either the “Add deals to sequences” or the “Re-engage idle leads using sequences” template, then click “Use template” in the Template preview screen.
In this example, we‘ll set up an automation to re-engage idle leads.
In the “Set up template” screen, choose the lead label that will trigger leads being sent to the sequence, the amount of time to wait, and the sequence you‘ll send them to and click “Save as draft.”
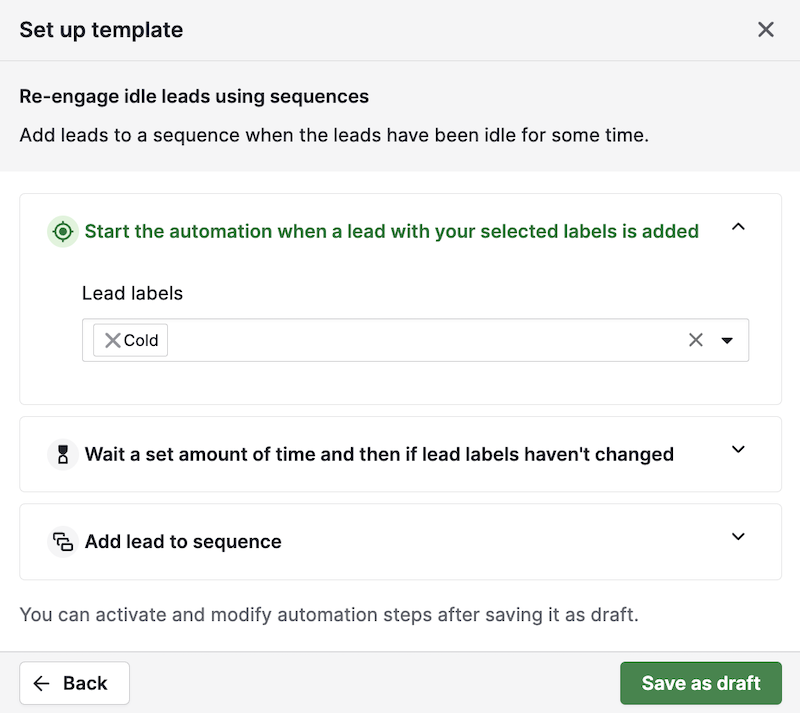
Then you‘ll go to the automation flow to review your automation. You can still edit some parts of it if you want, but remember to activate the toggle at the top.
Creating a sequence automation from scratch
You can also create an automation from scratch by going to Tools and apps > Automations and clicking “+ Automation.”
Choose your trigger among the available options:
Deal created/updated: deal-specific
Lead created/updated: lead-specific
Activity updated: action refers to the deal linked to the activity
Date trigger: can be used for both leads and deals
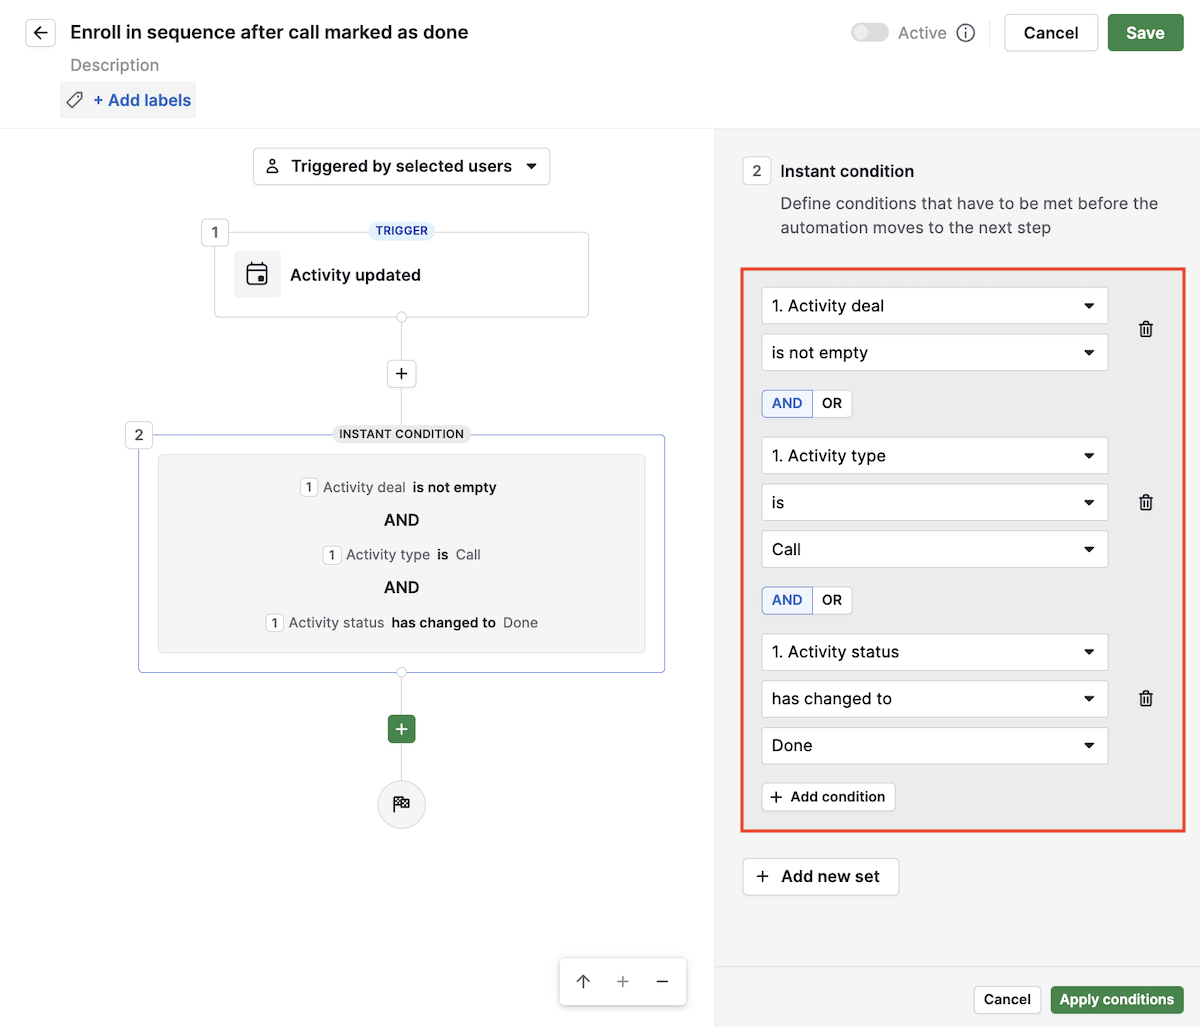
In this example, we‘ll create an automation to enroll deals into a sequence after a call activity connected to a deal is marked as done.
For this, you need the Activity updated trigger, adding the following conditions with the AND operator so they‘re all required to happen:
Activity deal is not empty: This ensures the activity is linked to a deal that will later be sent to the sequence, otherwise the automation will result in error
Activity type is call: You can choose another one if you want a different condition for your case
Activity status has changed to done: The activity must be marked as done for this step to work
After setting the conditions, add an action and select “Add deal/lead to sequence” from the Sequence group. Then, click “Next” and set the linked deal to Activity deal and choose a sequence from the drop-down menus.
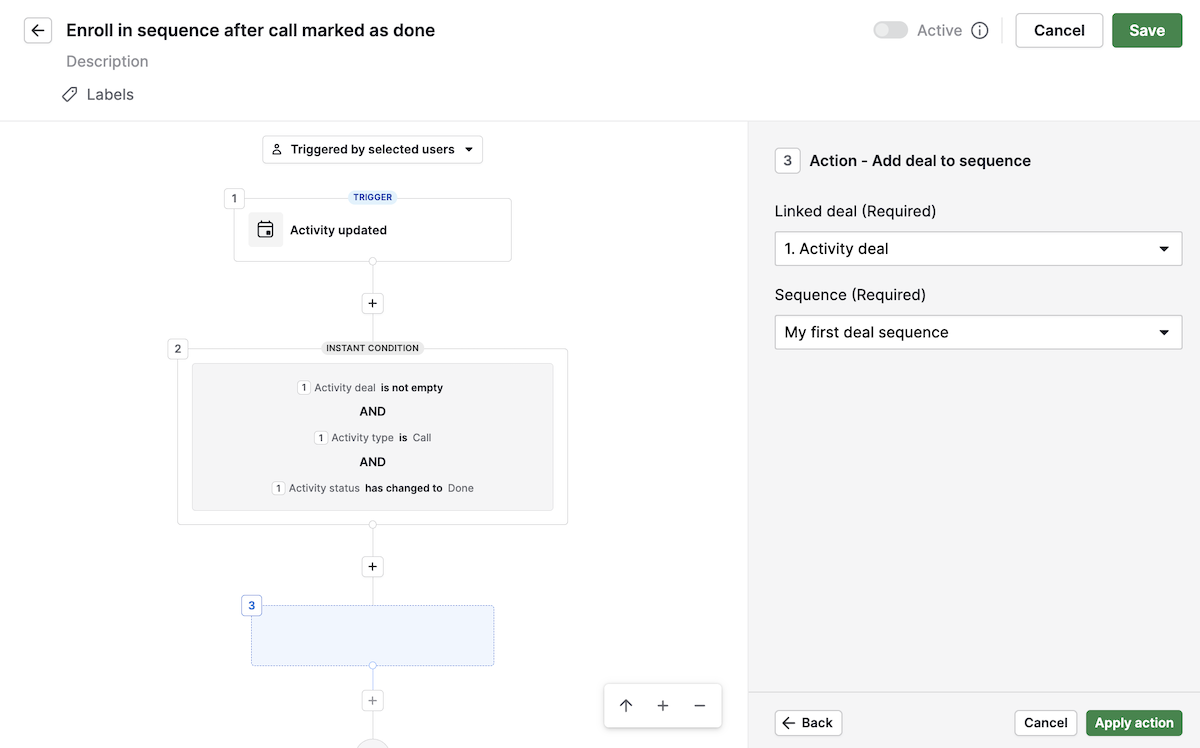
Click “Apply action” and, after clicking “Save” at the top, you‘ll be able to toggle the automation to active.
Note: You’ll only see sequences that contain at least one step. If you haven‘t created a sequence, you‘ll have to create one before linking it to an automation.
What to expect after setup
As soon as the trigger conditions are met, the deal or lead should be automatically added to the selected sequence.
The activity owner is the user defined in the sequence step.
You can monitor automatic enrollments both in the Sequence overview tab and in the automation execution history.
Troubleshooting and common error messages
If the enrollment fails, you’ll see the error details in the History tab in Automations. Common issues include:
The item owner did not sync their email with Pipedrive
Set up your email sync before using sequences with automated emails. For setup instructions, see this article about email sync.
The item owner didn‘t activate consent for delegated sending in the sequence
Ensure the user has enabled delegated sending in their account settings. Read more about this in the Delegated sending section of the Sequences feature article.
The item (deal or lead) was already enrolled in the sequence
Check the Sequence overview tab to confirm the enrollment. If you want the item to repeat the sequence, you’ll need to remove it first and then re-enroll it manually or through automation.
The sequence was deleted or can’t be found
Go to Pulse > Sequences and confirm the sequence is still active. If it was deleted, create a new sequence and update your automation with the new one.
You’ve reached the sequence’s enrollment limit
Review the sequence capacity in the Sequence overview tab. Completed or failed enrollments don‘t count toward the sequence capacity, but if you reach 100 items in a sequence, just duplicate it or create a new one to continue enrolling deals and leads.
Was this article helpful?
Yes
No