Campaigns: email domain authentication
What is email sender domain authentication?
Email sender domain authentication (or simply domain authentication) allows you to tell email service providers that Pipedrive is a trusted sender from your domains.
To give Pipedrive that permission, you need to add certain DNS records (CNAME and TXT) on your domain registrar page (like GoDaddy, Rackspace, Cloudflare and others) and point those records to Pipedrive.
Domain authentication is about security and deliverability. It helps you protect your brand’s reputation and ensures that your emails reach the inbox.
Authenticating your email domain doesn’t only protect your domain from being used for fraudulent, spam, or spoofing purposes. It also builds your trust and reputation score with the major Internet Service Providers (ISPs), translating directly into greater deliverability success and, ultimately, even better email campaign results.
Domain Name System (DNS) records
Sender Policy Framework (SPF)
SPF an email authentication protocol that domain owners use to specify the email servers they send email from, making it harder for fraudsters to spoof sender information.
DomainKeys Identified Mail (DKIM)
DKIM is a domain authentication technology that uses a cryptographic signature linked to a domain to guarantee the message was not altered between the sender and the receiver.
Technically, DKIM provides a method for validating a domain name identity that is associated with a message and the content of the message itself through cryptographic authentication. The identity is independent of other email identities, such as the author From: field.
Domain-based Message Authentication, Reporting and Conformance (DMARC)
DMARC is an email authentication protocol that prevents email senders and recipients from receiving spam, spoofing and phishing.
This protocol ensures the sender’s identity and the validity of the email. Configuring emails to pass DMARC is the only way for email senders to inform email recipients that the emails sent from their domain are legit.
Pipedrive domain authentication
In Campaigns, we require you to add three CNAME records to your domain registrar page.
The fourth record you need to add is the DMARC TXT record. It’s linked to your company and domain and guarantees no malicious company can impersonate a trusted Pipedrive sender.
Protocol | Record | |
Sender Policy Framework SPF | CNAME |
|
DomainKeys Identified Mail DKIM | CNAME
|
|
Domain-based Message Authentication, Reporting and Conformance DMARC | TXT |
|
Once you add these DNS records and after they have been propagated successfully (which may take up to 48 hours), you’ll need to click the refresh button to see the new status.
Learn how to edit your DNS records in this article.
How can I authenticate my email sender domain in Campaigns?
Before you start, there are three things you must know:
- Domain authentication is optional, but we strongly recommend it if you use our Campaigns feature and have DMARC-protected domains. Learn more about DMARC and how it can affect deliverability in this article.
- You can authenticate only the domains you or your company own and control. You’ll need to have access to the management of the DNS records of these domains. Learn more about DNS management in this article.
- Before you can send campaigns from an authenticated domain, you’ll have to verify the sender email associated with that domain.
Step 1
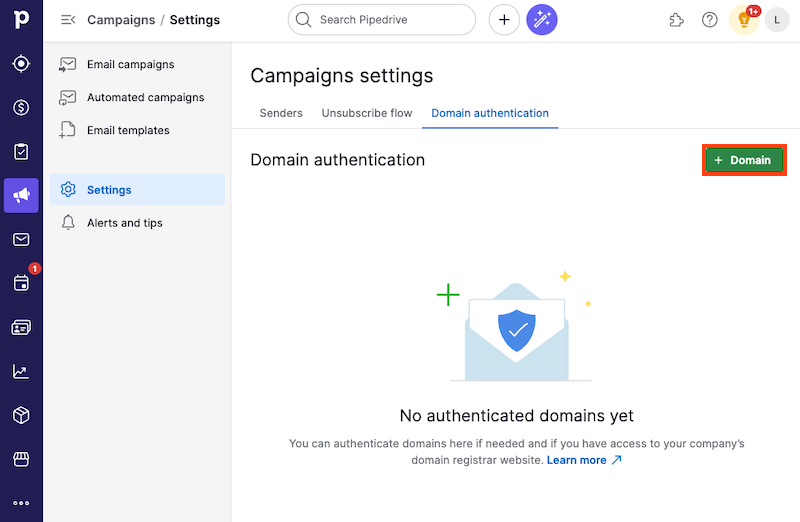
Go to Campaigns > Settings > Domain authentication and click on “+ Domain” on the right-hand side of the page.
Step 2
A small pop-up about domain information will appear.
Enter your domain name and click on “Get DNS records”.
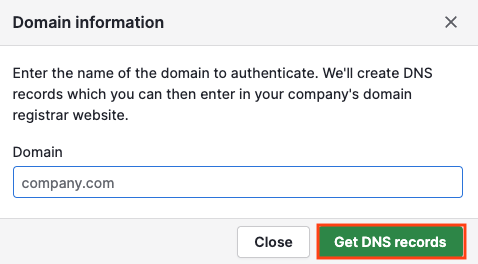
www, http:// or https:// prefixes. For example, yourcompany.com.Step 3
Your domain will be visible in the domain information section.
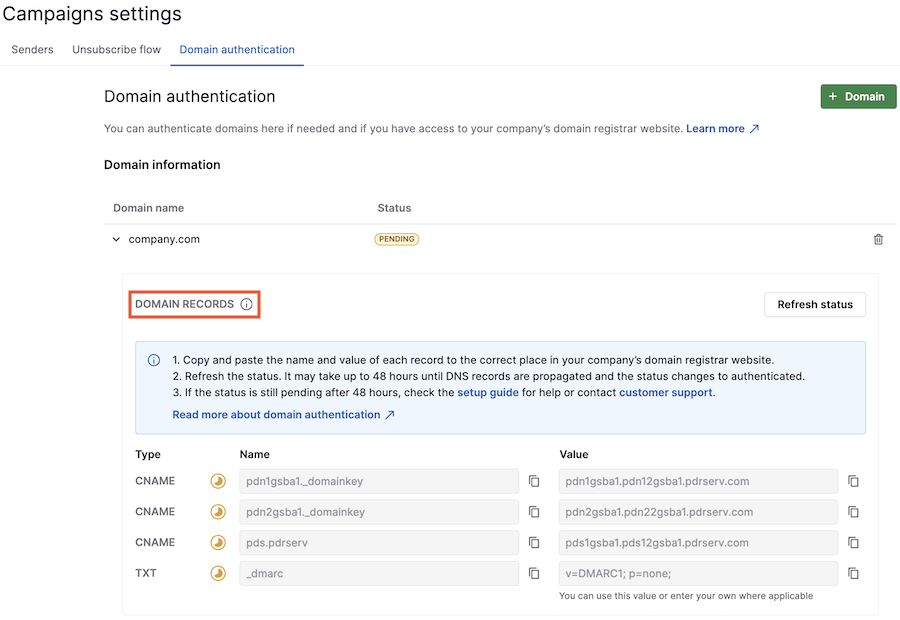
At the bottom of the page, you’ll see the domain records section. Here, you can find the CNAME and TXT records that you need to add to your DNS records list on your domain registrar’s website.
Step 4
You need to wait until the added DNS records are fully propagated.
DNS propagation is the process whereby DNS records are updated across all servers on the web. Any changes you make aren’t immediately visible because web servers store domain record information in their cache for a predetermined amount of time.
The timeframe for propagation depends on several factors, including your internet service provider (ISP), your domain’s registrar and the TTL (cache) values of your DNS records
To ensure that DNS records are in order, use online tools such as the MX Lookup Tool or Network Tools from MxToolBox .
Step 5
Your domain authentication will have a pending status until the propagation is complete.
Click on “Refresh status” to check the status of the propagation process.
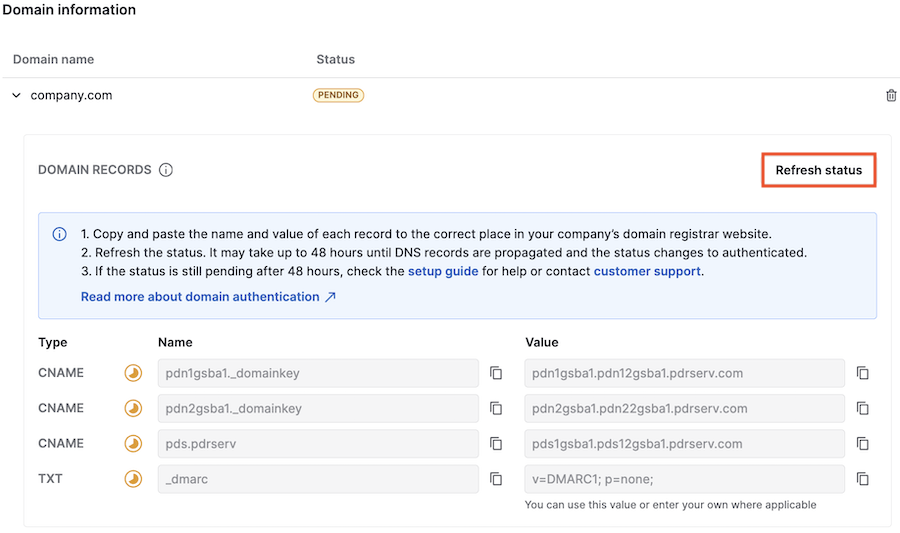
When the domain status changes to authenticated, it means the process has been completed and your email sender domain has been authenticated successfully.

Step 6
Once you have authenticated your email sender domain and verified your sender email, you can start creating and sending campaigns.
Choose the email linked to the authenticated domain in the sender email dropdown from your email campaigns menu.
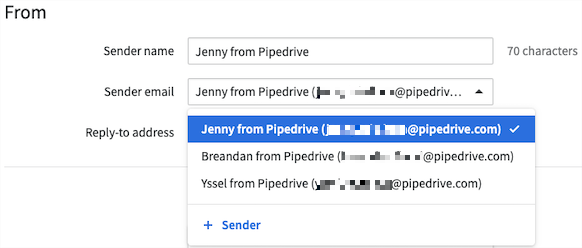
Now, you can start sending campaigns with an authenticated domain.
Was this article helpful?
Yes
No