Using Pipedrive single sign-on with Microsoft Entra ID
Pipedrive’s single sign-on (SSO) feature integrates with Microsoft Entra ID (formerly Azure AD) to ensure that your team can access Pipedrive easily using your identity provider.
What is single sign-on (SSO)?
Single sign-on allows users to access Pipedrive using their Microsoft Entra ID credentials. It enhances security, reduces password fatigue and provides administrators with centralized control over user access.
Prerequisites
Before you begin, make sure:
- You’re an admin user in both Pipedrive and Microsoft Entra ID
- You can access Company settings > Single sign-on in Pipedrive
- To write down your Pipedrive subdomain (e.g., companyname.pipedrive.com)
Installing Pipedrive in Entra ID
Start by going to your Entra ID account in Microsoft and selecting Identity > Enterprise applications > + New application.
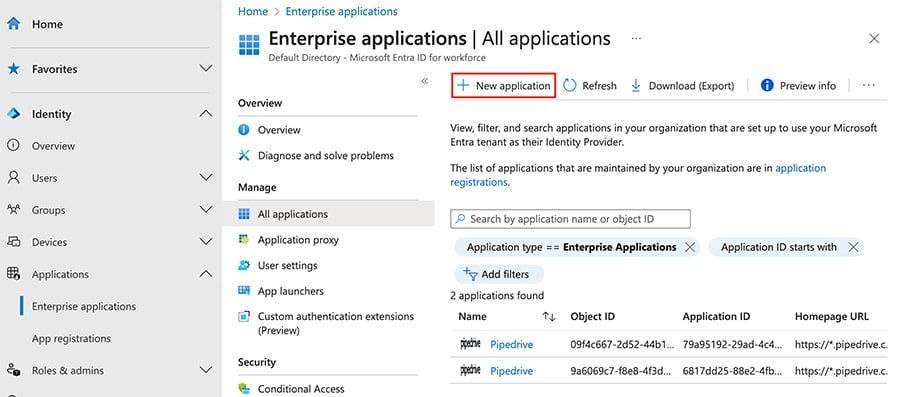
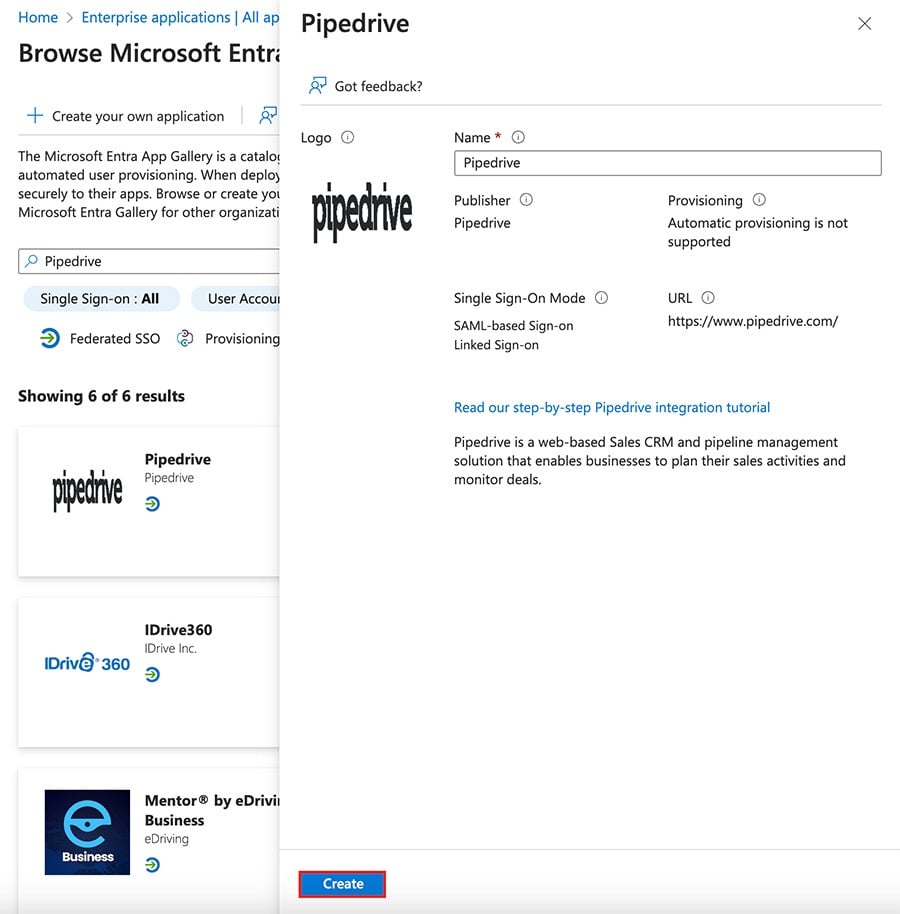
From there, use the search bar to find Pipedrive and select it as the option.

Then click “Create” to add it to your enterprise applications.
Setting up SSO
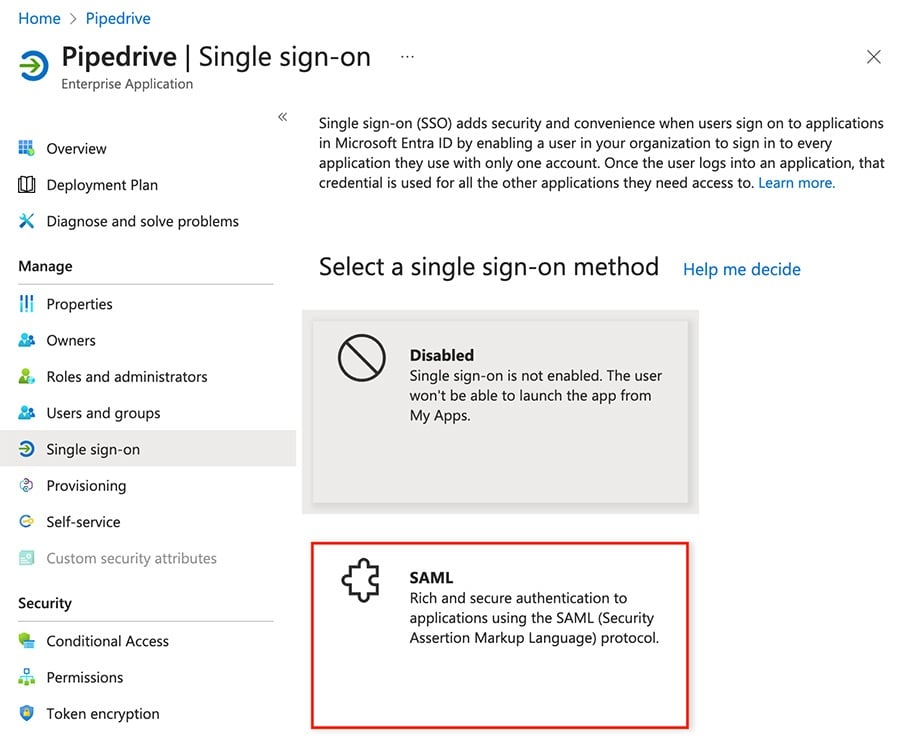
After adding Pipedrive as an app, you’ll be redirected to a window with the details about your new connection.
From here, click “Single sign-on” and then select “SAML” from the available method options.
Configuring SAML in Microsoft Entra
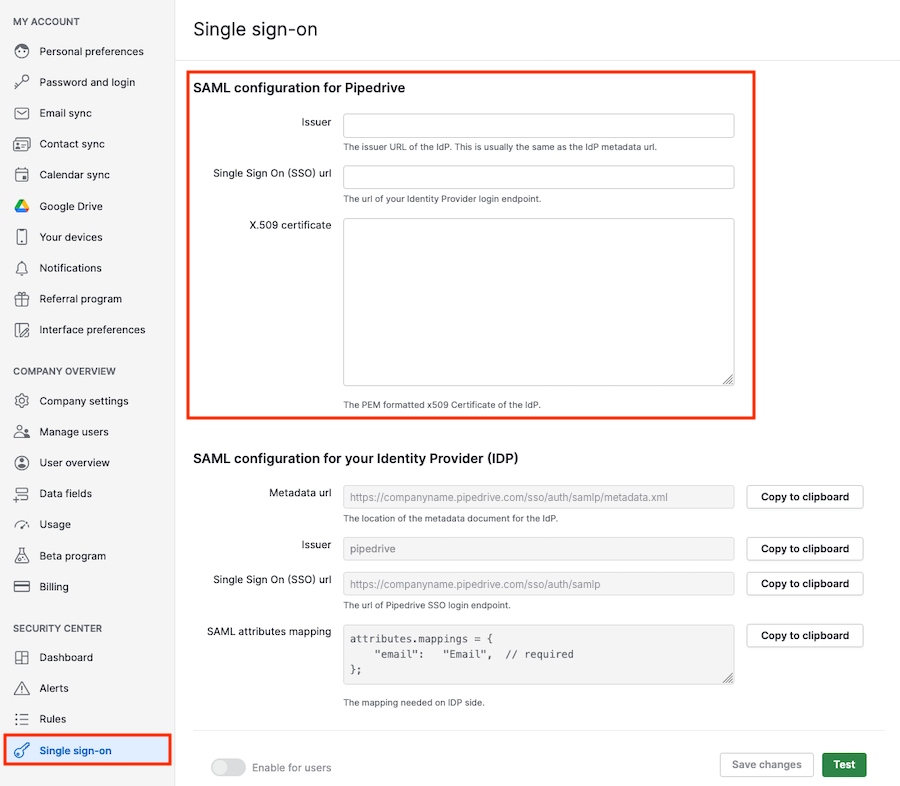
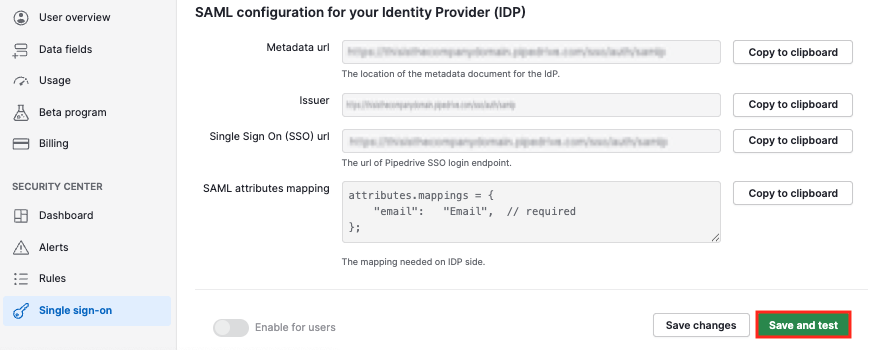
First, open Pipedrive on a separate browser tab with the details you‘ll need to copy. Click your account menu > Company settings > Single sign-on.
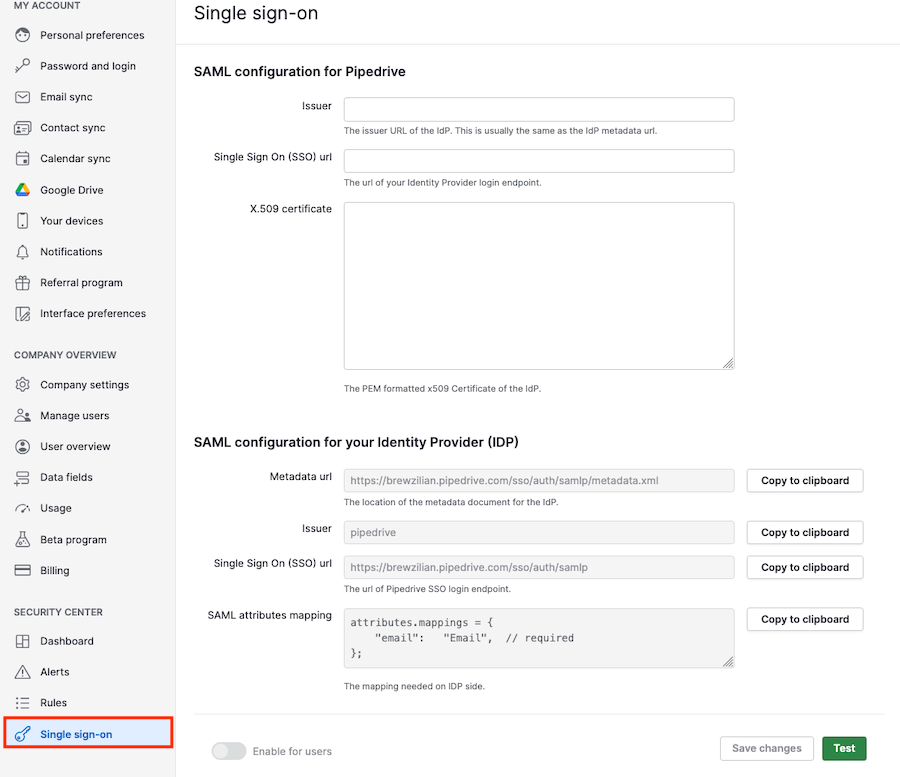
You‘ll copy the data that’s under SAML configuration for your Identity Provider (IDP) over to the Basic SAML Configuration section, following the table below:
SSO data from Pipedrive | Where to paste it into Microsoft Entra |
Metadata url: https://<COMPANY-NAME>.pipedrive.com/sso/auth/samlp/metadata.xml | Under “Identifier (Entity ID)”, click “Add identifier” and paste it in the text field. |
Single Sign On (SSO) url: https://<COMPANY-NAME>.pipedrive.com/sso/auth/samlp | Under “Reply URL (Assertion Customer Service URL),” click “Add reply URL” and paste it in the text field. |

Click “Save” at the top of the Microsoft Entra Basic SAML configuration page.
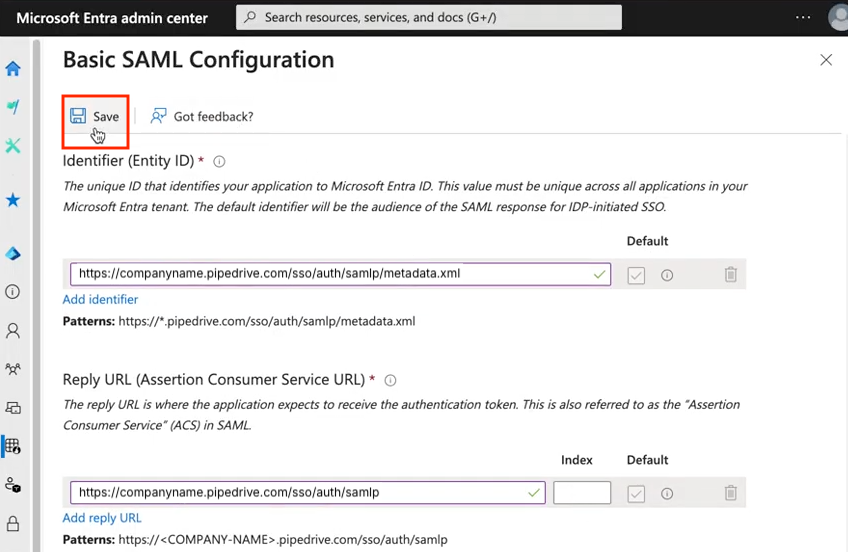
You should see a notification that your configuration was successfully saved.
Click the “X” at the top right corner to close the window.
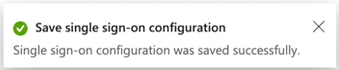
Under Attributes & Claims, make sure the field “Unique User Identifier” refers to user.userprincipalname, there‘s no need to change or add anything else.
Assigning users in Microsoft Entra
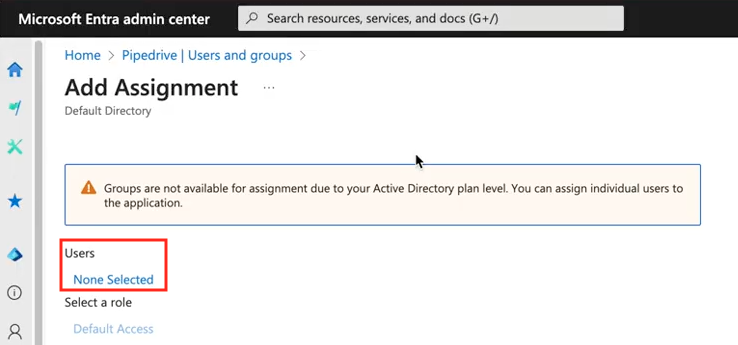
Still on the Microsoft Entra website, navigate to Users and groups > + Add user/group to open the Add Assignment screen.
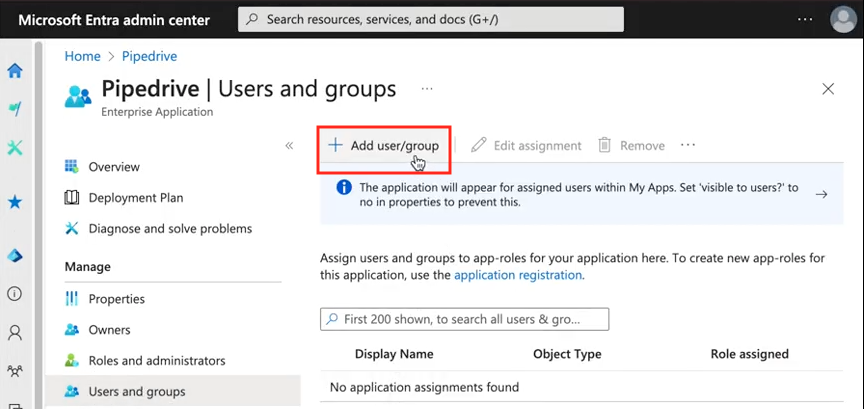
On the Add Assignment panel, under Users, click “None Selected” to bring up the user selection panel.
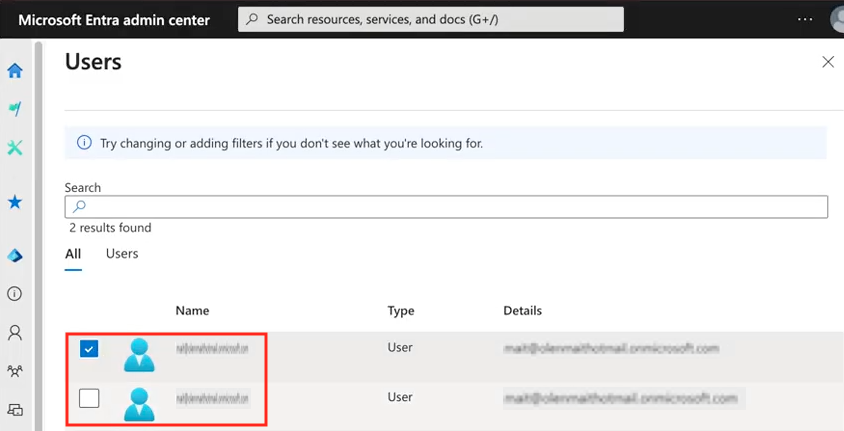
On the following screen, select the users who will use the single sign-on and click on “Assign.”
Configuring SAML on Pipedrive
Now you‘ll fill in the data in the SAML configuration for Pipedrive section of the Single sign-on area.
On the Microsoft Entra side, head over to sections 3 “SAML Certificates” and 4 “Set up Pipedrive” of the Single sign-on section.
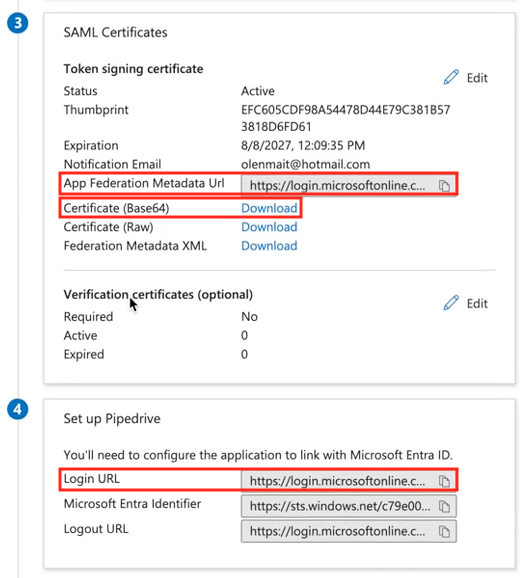
There, you‘ll need to:
Copy App Federation Metadata Url under section 3 and paste it into Issuer (in Pipedrive)
Login URL under section 4 and paste it into Single Sign On (SSO) url (in Pipedrive)
Then:
Click on “download” next to “Certificate (Base 64),” open it in any text editor application, copy its contents and paste it into X.509 certificate (in Pipedrive).
Data from Microsoft Entra | Where to paste in Pipedrive |
App Federation Metadata Url | Issuer |
Login URL | Single Sign On (SSO) url |
Certificate (Base 64) | X.509 certificate |
After pasting the required data, go back to Pipedrive and click “Save and test.”
If the test fails, ensure that all URLs and certificates are correct and that your user emails used in Pipedrive match perfectly with the list on Microsoft Entra.
You can also try generating the enterprise application from scratch a second time, as this approach has proven successful on several occasions.
If you still can’t connect, contact Pipedrive support.
The final step is to toggle “Enable for users” at the bottom to activate single sign-on on Pipedrive.
Was this article helpful?
Yes
No