Pipedrive integration: QuickBooks
With the QuickBooks integration app, you can create invoices from the deal detail view and seamlessly send them over to your QuickBooks account without the hassle of copying and pasting data between the two tools.
The integration can also provide updated statuses on the invoices created from Pipedrive, so you’ll know exactly when they’re paid or overdue without leaving the Pipedrive app.
Enabling the integration
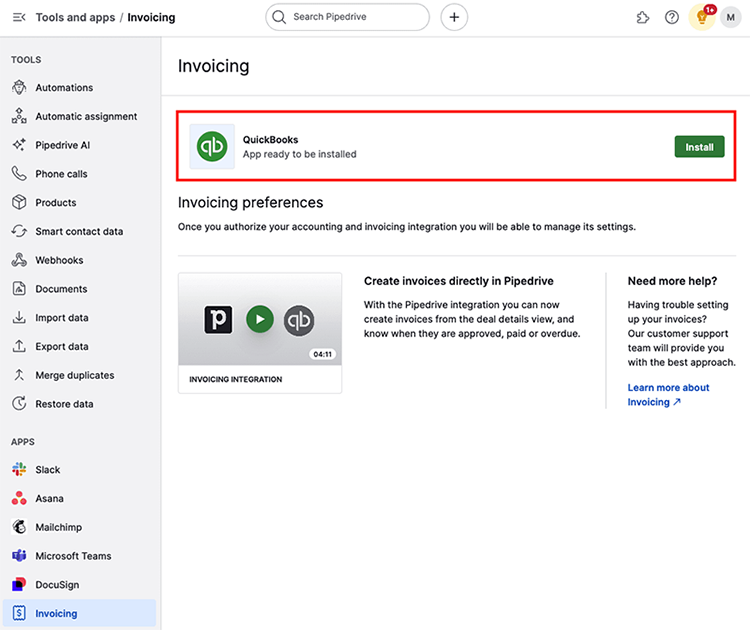
To connect your QuickBooks account, open the account menu in the top right corner, go to Tools and apps > Invoicing, and click “Install” next to QuickBooks.
You’ll be taken to the Pipedrive Marketplace, where you can complete the installation and grant access. The app can be uninstalled under Tools and apps > Marketplace apps.
Once your login credentials are confirmed, you’ll return to Pipedrive settings to configure QuickBooks preferences.
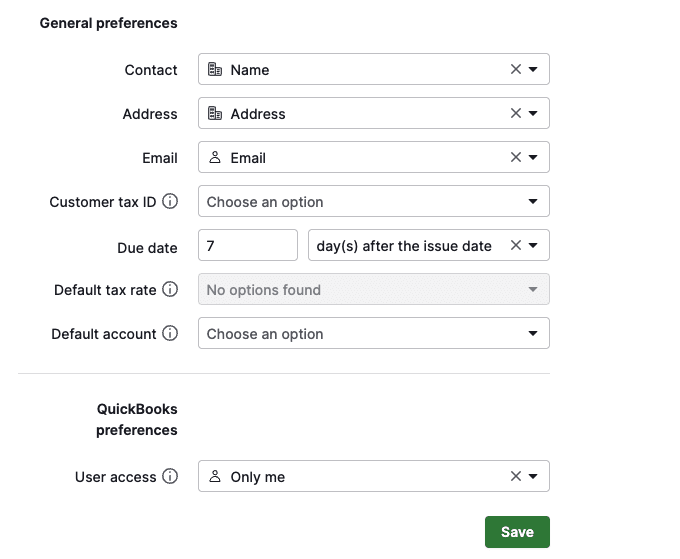
The following fields are auto-populated to QuickBooks when an invoice is created in Pipedrive:
- Contact – This field clarifies the recipient of the invoice. As invoices are typically paid by the accounts payable department of a company, we suggest using Pipedrive’s Organization – Name field. You can also choose from other organizations, contact and deal fields.
- Address – This field is for the physical address of the invoice’s recipient. Since invoices are typically paid by the accounts payable department of a company, we suggest using Pipedrive’s Organization – Address field. You can also choose from other organizations, contact and deal fields.
- Email – This field is the email address of the recipient of the invoice. As the email field in Pipedrive is a person-type field, we suggest utilizing Pipedrive’s Person – Email field. You can also choose from other organizations, contacts and deal fields.
- Customer tax ID – Not all invoices require this information, but if you have created a custom field in Pipedrive to hold your customer’s tax ID information, we suggest applying that field here.
- Due date – You can set the payment’s due date. For example, if the due date is set for seven days after the issue date, an invoice created on March 13th will have a due date of March 20th.
- Default tax rate – Use this field to clarify the default tax rate used for products on new invoices. You can override the default tax rate per invoice when needed.
- Default account – You can select the default income account to be used for new invoices. You can override the default account per invoice when needed.
The user access setting allows you to clarify whether you or all users can access, issue, and manage invoices on your company’s behalf.
Once you’re satisfied with your selections, click the “Save” button to save your QuickBooks integration preferences for your Pipedrive company account.
Using the integration
After completing your integration setup, navigate to the detail view of any deal to create your first invoice. Click on the “Invoice” tab and select “+ Invoice” to begin.

Although most information is automatically filled based on the fields you selected in the settings earlier and the values associated with the particular deal, make sure you include any missing details.
You’ll see a create invoice window which is divided into three sections:
Customer details
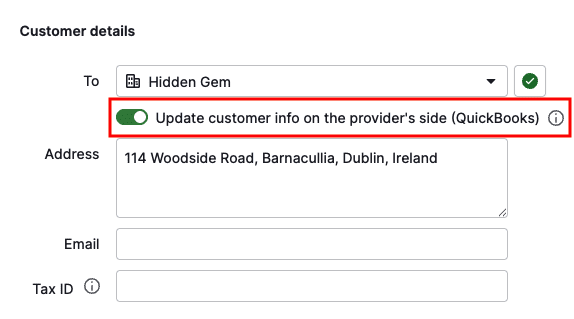
This section reflects information about the invoice recipient, such as the name of the entity being invoiced, the address, email and Tax ID.
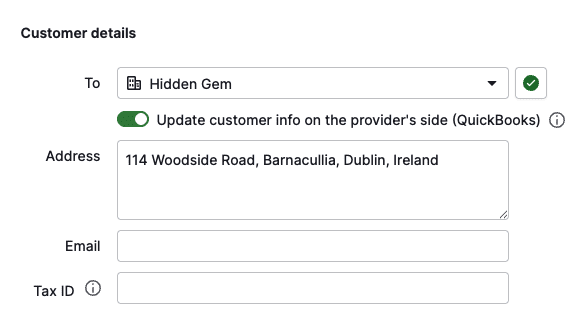
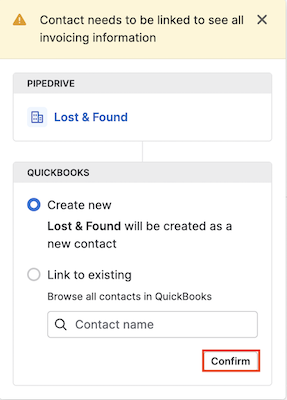
Begin your review with the customer details section. If a warning icon appears for the “To” field, it indicates that the contact is not linked to QuickBooks.

To create an invoice successfully, click on the warning icon and either create a new contact or link the invoice to an existing customer in your QuickBooks account. In either case, you’ll need to click “Confirm” to complete the linking.
You’ll also notice that you can update customer info on the provider’s side. When enabled, the address, email and Tax ID of the invoice recipient will be pulled into QuickBooks.
Invoice details
This section includes information about invoicing specific details such as tax, issue and due dates, currency and invoice number.
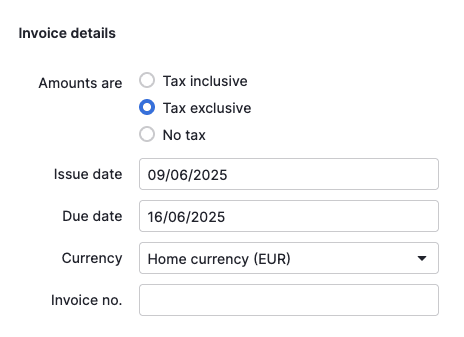
In the invoice details section, you can adjust all the fields to meet your company’s needs. Note that the currency must be filled out since it’s a mandatory field on QuickBooks.
Invoice items
This section lists the products or services that make up the charges in your invoice.

While the products linked with the deal are automatically populated in the invoice items section, you can also add more items to your list. Learn more about how to add products to your deals in this article.
After entering all the details, click the “Create invoice” button to send this to your QuickBooks account.
Viewing your invoices
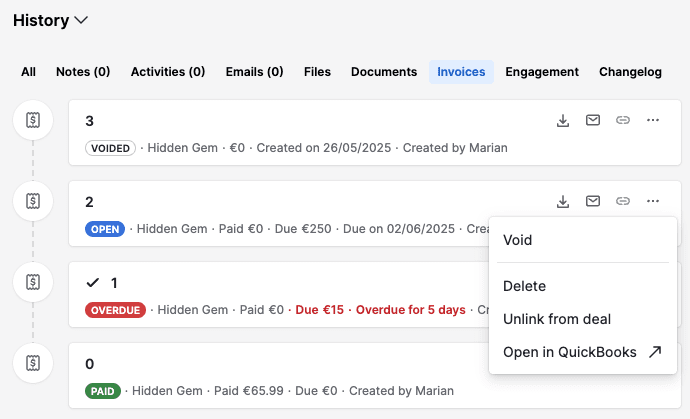
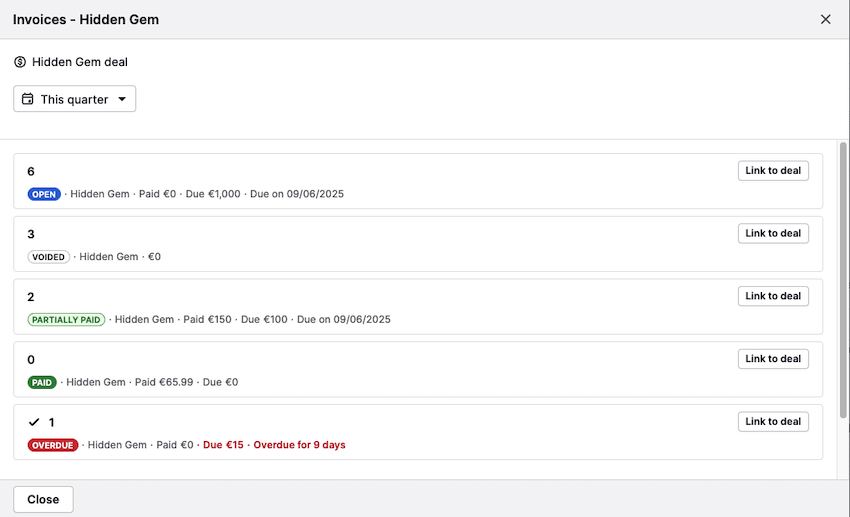
Your new invoice will appear under the invoices tab in the history section of your deal detail view. The invoices in Pipedrive will reflect the following flags based on their statuses:
- Open
- Paid
- Voided
- Overdue
- Partially paid
Three icons in the upper right corner of the invoice allow you to do the following:
- Download PDF – Download a PDF version of your invoice to send to your clients directly
- Send by email – Send any paid or due invoices directly to your customer. Invoices will be sent from QuickBooks.
- Copy link – You can generate a public link for sharing the invoice. This option is only available when your QuickBooks account has online payments enabled and the invoice includes an email address.
Click “...” for more options:
- Void – Void any unpaid or paid invoices. Voided invoices can’t be unvoided.
- Delete – Deletes the invoice both from Pipedrive and QuickBooks
- Unlink from deal – Remove the invoice from the deal
- Open in QuickBooks – Clicking this option will take you to your QuickBooks account, where you can edit your invoice, send it, and accept payment
Detail view sidebar
Your invoice history will be included in the sidebar of the deal detail view. Here you can refresh to bring in any new updates from QuickBooks, or click on “...” to go to settings or unlink your contact.

Click on “View all invoices” to view more details on all of the linked invoices filtered by a customizable time frame.
You can view all invoices associated with the linked contact and manage linking and unlinking those invoices to the deal you’re currently viewing.
Was this article helpful?
Yes
No